7.2. Creating a UniTensor
As mentioned in the introduction, a UniTensor consists of Block(s), Bond(s) and label(s). The Block(s) contain the data, while Bond(s) and label(s) are the meta data that describe the properties of the UniTensor.
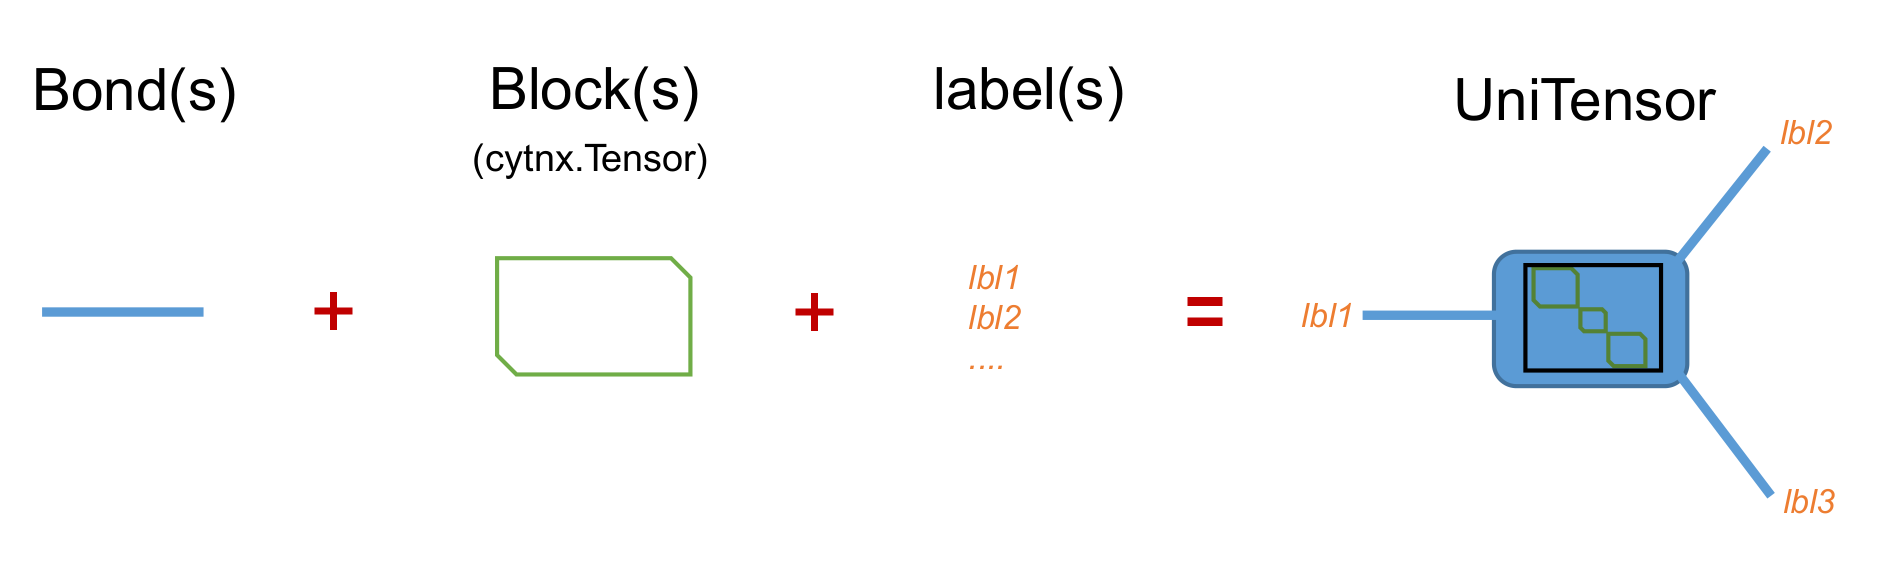
Generally, there are two types of UniTensor types: un-tagged and tagged, depending on whether the Bonds have a direction. In more advanced applications, a UniTensor may have block diagonal or other more complicated structure when symmetries are involved. Therefore, UniTensors can further be categorized into non-symmetric and symmetric (block form):
non-symmetric |
symmetric (block-diagonal) |
|
tagged |
O |
O |
untagged |
O |
X |
In the following, we will explain how to construct a UniTensor.
7.2.1. Using generators
Similar to the initialization of a Tensor, one can create a UniTensor through generators such as zero, ones, normal, uniform, arange and eye. The first argument provides shape information, which is used to construct the Bond objects and to determine the rank – the number of tensor indices. Labels can be specified when creating a UniTensor, otherwise they are set to be “0”, “1”, “2”, … by default.
This gives us the first type of a UniTensor: an untagged UniTensor.
In Python:
 1# Create a rank-3 UniTensor with shape [2,3,4]
 2# 1) initialized by zeros, using method chaining (preferred)
 3uT0 = cytnx.UniTensor.zeros([2,3,4]).relabel(["a","b","c"]).set_name("all zeros")
 4
 5# 2) initialized by ones, using initializer arguments
 6uT1 = cytnx.UniTensor.ones([2,3,4], ["a","b","c"], name="all ones")
 7
 8# 3) initialize by normally distributed elements with mean value 0 and standard deviation 1
 9uTg = cytnx.UniTensor.normal([2,3,4],0,1).relabel(["a","b","c"]).set_name("Gaussian")
10
11# 4) initialize by uniformly distributed elements between 0 and 100
12uTu = cytnx.UniTensor.uniform([2,3,4],0,100).relabel(["a","b","c"]).set_name("random uniform")
13
14# 5) initialize with subsequent numbers from 0 to 2*3*4 - 1 = 23
15uTarr0 = cytnx.UniTensor.arange(2*3*4).reshape(2,3,4).set_rowrank(1) \
16                        .relabel(["a","b","c"]).set_name("range 0, 1, ..., 23")
17
18# 6) initialize with subsequent numbers from starting from 5 to 53 with a stepwidth of 2
19uTarr5 = cytnx.UniTensor.arange(5, 53, 2).reshape(2,3,4).set_rowrank(1) \
20                        .relabel(["a","b","c"]).set_name("range 5, 7, ...., 53")
21
22# Create a 4x4 identity matrix
23uTe = cytnx.UniTensor.eye(4, ["left","right"], name="identity")
Note
The generator eye expects the number of diagonal elements as a first argument instead of the shape of the resulting UniTensor.
Note
The generator arange creates a one-dimensional UniTensor. In order to obtain a desired shape, use reshape and set_rowrank (see Reshape and Rowrank). If arange receives one argument, it is the number of elements. If three arguments are given, these correspond to start, stop, and stepsize. This syntax is similar to numpy.arange().
We can use print_diagram() to visualize a UniTensors in a more straightforward way as a diagram:
In Python:
1uT0.print_diagram()
2uTe.print_diagram()
Output >>
-----------------------
tensor Name : all zeros
tensor Rank : 3
block_form  : False
is_diag     : False
on device   : cytnx device: CPU
          ---------
         /         \
   a ____| 2     3 |____ b
         |         |
         |       4 |____ c
         \         /
          ---------
-----------------------
tensor Name : identity
tensor Rank : 2
block_form  : False
is_diag     : False
on device   : cytnx device: CPU
             ---------
            /         \
   left ____| 4     4 |____ right
            \         /
             ---------
The information provided by this output is explained in detail in print_diagram().
7.2.2. Constructing from Tensor
We can also convert a cytnx.Tensor into a UniTensor to create an untagged UniTensor.
In the following, we consider a simple rank-3 tensor as an example. The tensor diagram looks like:
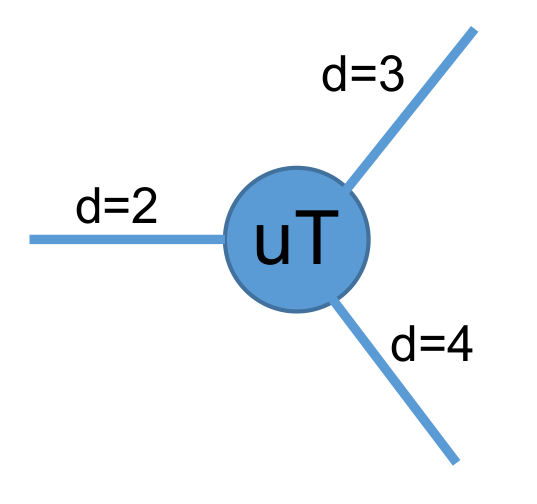
We can convert such a Tensor to a UniTensor:
In Python:
1# create a rank-3 tensor with shape [2,3,4]
2T = cytnx.arange(2*3*4).reshape(2,3,4)
3# convert to UniTensor:
4uT = cytnx.UniTensor(T)
Here, the Tensor T is converted to a UniTensor uT simply by wrapping it with constructor cytnx.UniTensor(). Formally, we can think of this as constructing a UniTensor uT with T being its block (data). If we want to create a UniTensor with different dtype, for example, a complex UniTensor, we can do:
In Python:
1# initialize a UniTensor with complex data type
2uT = cytnx.UniTensor.zeros([2,3,4], dtype=cytnx.Type.ComplexDouble) \
3          .set_name("uT").relabel(["a", "b", "c"])
4# randomize the elements with a uniform distribution in the range [low, high]
5cytnx.random.uniform_(uT, low = -1., high = 1.)
6# visualize UniTensor
7uT.print_diagram()
Output >>
-----------------------
tensor Name : zeros
tensor Rank : 3
block_form  : False
is_diag     : False
on device   : cytnx device: CPU
          ---------
         /         \
   0 ____| 2     3 |____ 1
         |         |
         |       4 |____ 2
         \         /
          ---------
We see that a UniTensor with the same shape as T was created. The bond labels are set to the default values “0”, “1” and “2”.
7.2.3. From scratch
Next, let’s introduce the complete API for constructing a UniTensor from scratch:
- UniTensor(bonds, labels, rowrank, dtype, device, is_diag)
- Parameters:
bonds (List[cytnx.Bond]) – list of bonds
labels (List[string]) – list of labels associate to each bond
rowrank (int) – rowrank used when flattened into a matrix
dtype (cytnx.Type) – the dtype of the block(s)
device (cytnx.Device) – the device where the block(s) are held
is_diag (bool) – whether the UniTensor is diagonal
The first argument bonds is a list of Bond objects. These correspond to the shape of a cytnx.Tensor where the elements in shape indicate the dimensions of the bonds. Here, each bond is represent by a cytnx.Bond object. In general, cytnx.Bond contains three things:
The dimension of the bond.
The direction of the bond (it can be BD_REG–undirectional, BD_KET (BD_IN)–inward, BD_BRA (BD_OUT)–outward)
The symmetry and the associate quantum numbers.
For more details, see Bond. Here, for simplicity, we will use only the dimension property of a Bond.
Now let’s construct the rank-3 UniTensor with the same shape as in the above example. We assign the three bonds with labels (“a”, “b”, “c”) and also set name to be “uT2 scratch”.
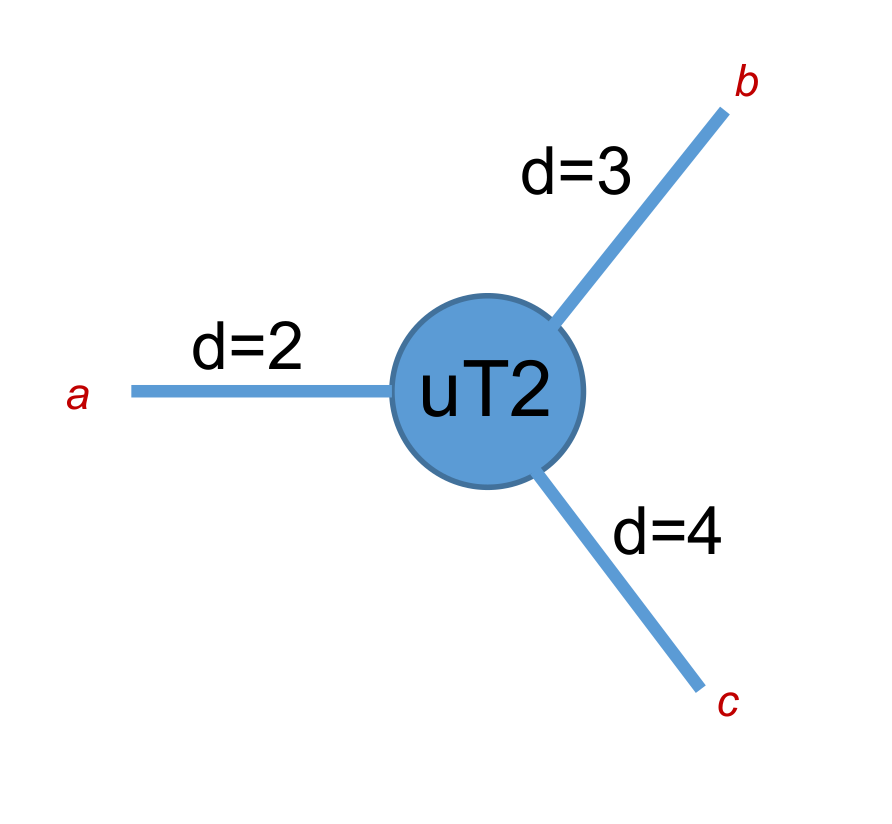
In Python:
1uT2 = cytnx.UniTensor([cytnx.Bond(2),cytnx.Bond(3),cytnx.Bond(4)],labels=["a","b","c"],rowrank=1)
2uT2.set_name("uT2 scratch")
3uT2.print_diagram()
4print(uT2)
Output >>
-----------------------
tensor Name : uT2 scratch
tensor Rank : 3
block_form  : False
is_diag     : False
on device   : cytnx device: CPU
          ---------
         /         \
   a ____| 2     3 |____ b
         |         |
         |       4 |____ c
         \         /
          ---------
-------- start of print ---------
Tensor name: uT2 scratch
is_diag    : False
contiguous : True

Total elem: 24
type  : Double (Float64)
cytnx device: CPU
Shape : (2,3,4)
[[[0.00000e+00 0.00000e+00 0.00000e+00 0.00000e+00 ]
  [0.00000e+00 0.00000e+00 0.00000e+00 0.00000e+00 ]
  [0.00000e+00 0.00000e+00 0.00000e+00 0.00000e+00 ]]
 [[0.00000e+00 0.00000e+00 0.00000e+00 0.00000e+00 ]
  [0.00000e+00 0.00000e+00 0.00000e+00 0.00000e+00 ]
  [0.00000e+00 0.00000e+00 0.00000e+00 0.00000e+00 ]]]
Note
The UniTensor will have all the elements in the block initialized with zeros.
7.2.4. Type conversion
It is possible to convert a UniTensor to a different data type. To convert the data type, simply use UniTensor.astype().
For example, consider a UniTensor A with dtype=Type.Int64, which shall be converted to Type.Double:
In Python:
1A = cytnx.UniTensor.ones([3,4],dtype=cytnx.Type.Int64)
2B = A.astype(cytnx.Type.Double)
3print(A.dtype_str())
4print(B.dtype_str())
Output >>
Int64
Double (Float64)
Note
UniTensor.dtype() returns a type-id, while UniTensor.dtype_str() returns the type name.
7.2.5. Transfer between devices
Moving a UniTensor between different devices is very easy. We can use UniTensor.to() to move the UniTensor to a different device.
For example, let’s create a UniTensor in the memory accessible by the CPU and transfer it to the GPU with gpu-id=0.
In Python:
1A = cytnx.UniTensor.ones([2,2]) #on CPU
2B = A.to(cytnx.Device.cuda+0)
3print(A) # on CPU
4print(B) # on GPU
5
6A.to_(cytnx.Device.cuda)
7print(A) # on GPU
Output >>
Note
You can use UniTensor.device() to get the current device-id (cpu = -1), whereas UniTensor.device_str() returns the device name.
UniTensor.to() will return a copy on the target device. If you want to move the current Tensor to another device, use UniTensor.to_() (with underscore).
7.2.6. Tagged UniTensors and UniTensors with Symmetries
The creation of tagged, non-symmetric UniTensors will be explained in Tagged UniTensor. Symmetric UniTensors are discussed in UniTensor with Symmetries.