7.1. Print and display
Cytnx provides several ways to display the data stored in a UniTensor. This can be helpful to check the implementation.
For demonstration purposes, we create three tensors in the following.
In Python:
 1uT = cytnx.UniTensor(cytnx.ones([2,3,4]),
 2                     name="untagged tensor",
 3                     labels=["a","b","c"])
 4
 5bond_d = cytnx.Bond(
 6    cytnx.BD_IN, [cytnx.Qs(1)>>1, cytnx.Qs(-1)>>1],
 7    [cytnx.Symmetry.U1()])
 8
 9bond_e = cytnx.Bond(
10    cytnx.BD_IN, [cytnx.Qs(1)>>1, cytnx.Qs(-1)>>1],
11    [cytnx.Symmetry.U1()])
12
13bond_f = cytnx.Bond(
14    cytnx.BD_OUT,
15    [cytnx.Qs(2)>>1, cytnx.Qs(0)>>2,
16     cytnx.Qs(-2)>>1],
17    [cytnx.Symmetry.U1()])
18
19bond_g = cytnx.Bond(2,cytnx.BD_OUT)
20bond_h = cytnx.Bond(2,cytnx.BD_IN)
21
22Tsymm = cytnx.UniTensor(
23    [bond_d, bond_e, bond_f],
24    name="symm. tensor", labels=["d","e","f"])
25
26Tdiag = cytnx.UniTensor(
27    [bond_g, bond_h], is_diag=True,
28    name="diag tensor", labels=["g","h"])
We will discuss how a UniTensor is created in Creating a UniTensor and the details about Symmetry, Bonds etc. in the following subchapters. Here, we want to focus on the output of print_diagram() and print, so no need to understand the lines above in detail.
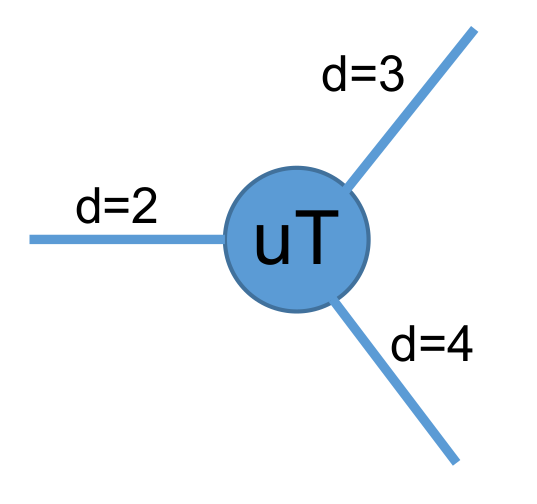
The tensor diagram of the three-leg UniTensor uT looks like:
7.1.1. print_diagram()
We can use print_diagram() to visualize the basic properties of a UniTensor
In Python:
1uT.print_diagram()
2Tsymm.print_diagram()
3Tdiag.print_diagram()
Output >>
-----------------------
tensor Name : untagged tensor
tensor Rank : 3
block_form  : False
is_diag     : False
on device   : cytnx device: CPU
          ---------
         /         \
   a ____| 2     3 |____ b
         |         |
         |       4 |____ c
         \         /
          ---------
-----------------------
tensor Name : symm. tensor
tensor Rank : 3
contiguous  : True
valid blocks : 4
is diag   : False
on device   : cytnx device: CPU
      row           col
         -----------
         |         |
   d  -->| 2     4 |-->  f
         |         |
   e  -->| 2       |
         |         |
         -----------

-----------------------
tensor Name : diag tensor
tensor Rank : 2
block_form  : False
is_diag     : True
on device   : cytnx device: CPU
braket_form : False
      row           col
         -----------
         |         |
   g *<--| 2     2 |<--* h
         |         |
         -----------
The information provided by the output is explained in the following:
Bonds: They are attached to the left side and/or right side of the center square. Now you might wonder why there are Bonds going to two sides? In Cytnx, we use a property called rowrank which defines this. The first rowrank Bonds will be considered to direct to the left and the rest will be on the right. When the left and right indices are combined, a tensor can be brought into matrix form, which is particularly useful for linear algebra operations. We will get back to this property in the following sections, particularly in Rowrank. For now, let’s just assume that rowrank takes an arbitrary integer 0 < rowrank < rank. The number of Bonds indicates the rank of the UniTensor, which is also printed in the second line as tensor Rank.
- Examples:
uT has three Bonds, indicating it is a rank-3 UniTensor
Tsymm has rank-3 as well
Tdiag has rank-2.
Labels&dimensions: The number on the outside of each bond represents the label of that bond, and the numbers inside the box indicate the dimension (number of elements) of each bond.
- Example uT:
The bond on the left side has dimension=2 and label=”a”.
The bond on the upper-right has dimension=3 and label=”b”.
The bond on the lower-right has dimension=4 and label=”c”.
Note
The bonds are ordered and arranged from left to right and up to down. In the example, uT has the bond with label=”a” as the first bond (index=0); the bond with label=”b” is the second bond (index=1); the bond with label=”c” is the 3rd bond (index=2).
Note
The labels of bonds are strings, and therefore text. By default, these labels are set to “0”, “1”, … if no label names are defined. These are strings containing the corresponding number. Labels can not be integers. This is because in many APIs a Bond can either be addressed by its index number (integer) as for a cytnx.Tensor or by its name (string).
tensor name: The name (alias) of the UniTensor.
- Examples:
uT has the name untagged tensor
Tsymm has the name symm. tensor
Tdiag has the name diag tensor.
Users can name a UniTensor with UniTensor.set_name():
In Python:
1uT.set_name("tensor uT")
2uT.print_diagram()
Output >>
-----------------------
tensor Name : tensor uT
tensor Rank : 3
block_form  : False
is_diag     : False
on device   : cytnx device: CPU
          ---------
         /         \
   a ____| 2     3 |____ b
         |         |
         |       4 |____ c
         \         /
          ---------
Tip
You can use UniTensor.name() to get the name property of the UniTensor.
block_form/valid blocks: UniTensors have different ways in which the data is stored. A normal tensor without symmetries is just a dense Tensor and can be seen as a cytnx.Tensor with additional metadata. In this case block_form : False will be displayed. For UniTensors with symmetries, only certain index combinations lead to entries that fulfill the symmetry properties. Only this data is stored in the UniTensor. Therefore, the data can be split into several valid blocks. With UniTensor.is_blockform() one can check whether a UniTensor is of this form. If so, the number of blocks in the UniTensor is displayed by print_diagram().
- Examples:
uT has uT.is_blockform() == False
Tsymm has Tsymm.is_blockform() == True and contains four valid blocks
Tdiag has Tdiag.is_blockform() == True and contains one valid block.
is_diag: indicates if the UniTensor is a symmetric matrix. In this case, only the diagonal entries are stored. This is True in the above example for Tdiag.
on device: This indicates the device where the data of the UniTensor is stored (CPU or GPU). See Device for details.
Tip
Similar to cytnx.Tensor, one can use .to() to move a UniTensor between devices!
Note
The dtype and device of a UniTensor depends on the underlying block (data) of the UniTensor.
The UniTensors Tsymm and Tdiag have directional Bonds. The direction of the Bonds is indicated by arrows in the output of print_diagram(). This way, incoming/Ket- and outgoing/Bra-Bonds can be distinguished graphically. If all indices on the left are incoming and all indices on the right outgoing, the UniTensor is in braket_form. Directed Bonds that violate this form are marked with a ‘*’. This is the case for both indices of the UniTensor Tdiag.
A tagged UniTensor, that is a UniTensor with directed Bonds, is represented by a rectangular box. See Tsymm and Tdiag in the above example. An untagged UniTensor like uT is printed with rounded corners.
7.1.2. print() and print_blocks()
Further information and the actual data is printed with UniTensor.print_blocks(). Equivalently, one can use print(uT) where uT is a UniTensor.
In Python:
1uT.print_blocks()
2print(Tdiag)
Output >>
-------- start of print ---------
Tensor name: tensor uT
is_diag    : False
contiguous : True

Total elem: 24
type  : Double (Float64)
cytnx device: CPU
Shape : (2,3,4)
[[[1.00000e+00 1.00000e+00 1.00000e+00 1.00000e+00 ]
  [1.00000e+00 1.00000e+00 1.00000e+00 1.00000e+00 ]
  [1.00000e+00 1.00000e+00 1.00000e+00 1.00000e+00 ]]
 [[1.00000e+00 1.00000e+00 1.00000e+00 1.00000e+00 ]
  [1.00000e+00 1.00000e+00 1.00000e+00 1.00000e+00 ]
  [1.00000e+00 1.00000e+00 1.00000e+00 1.00000e+00 ]]]


-------- start of print ---------
Tensor name: diag tensor
braket_form : False
is_diag    : True
contiguous : True

Total elem: 2
type  : Double (Float64)
cytnx device: CPU
Shape : (2)
[0.00000e+00 0.00000e+00 ]
Similarly to print_diagram(), the properties name, is_diag and cytnx device are provided. Additionally, one can see the shape and total number of elements, as well as the data type. Furthermore, the contiguous status is displayed, see Contiguous for details.
Finally, the data is printed. In the case of a dense tensor like uT, the elements are given as a nested list with brackets [] combining the elements according to the shape. In the case of a diagonal matrix like Udiag, the diagonal entries are printed as a vector.
For a UniTensor in blockform, all blocks are printed separately:
In Python:
1print(Tsymm)
Output >>
-------- start of print ---------
Tensor name: symm. tensor
braket_form : True
is_diag    : False
[OVERALL] contiguous : True
========================
BLOCK [#0]
 |- []   : Qn index
 |- Sym(): Qnum of correspond symmetry
                 -----------
                 |         |
   [0] U1(1)  -->| 1     1 |-->  [0] U1(2)
                 |         |
   [0] U1(1)  -->| 1       |
                 |         |
                 -----------

Total elem: 1
type  : Double (Float64)
cytnx device: CPU
Shape : (1,1,1)
[[[0.00000e+00 ]]]

========================
BLOCK [#1]
 |- []   : Qn index
 |- Sym(): Qnum of correspond symmetry
                  -----------
                  |         |
   [0] U1(1)   -->| 1     2 |-->  [1] U1(0)
                  |         |
   [1] U1(-1)  -->| 1       |
                  |         |
                  -----------

Total elem: 2
type  : Double (Float64)
cytnx device: CPU
Shape : (1,1,2)
[[[0.00000e+00 0.00000e+00 ]]]

========================
BLOCK [#2]
 |- []   : Qn index
 |- Sym(): Qnum of correspond symmetry
                  -----------
                  |         |
   [1] U1(-1)  -->| 1     2 |-->  [1] U1(0)
                  |         |
   [0] U1(1)   -->| 1       |
                  |         |
                  -----------

Total elem: 2
type  : Double (Float64)
cytnx device: CPU
Shape : (1,1,2)
[[[0.00000e+00 0.00000e+00 ]]]

========================
BLOCK [#3]
 |- []   : Qn index
 |- Sym(): Qnum of correspond symmetry
                  -----------
                  |         |
   [1] U1(-1)  -->| 1     1 |-->  [2] U1(-2)
                  |         |
   [1] U1(-1)  -->| 1       |
                  |         |
                  -----------

Total elem: 1
type  : Double (Float64)
cytnx device: CPU
Shape : (1,1,1)
[[[0.00000e+00 ]]]
A UniTensor with Symmetries has Bonds carrying quantum numbers. In our example, the quantum numbers are printed as U1(-2), U1(-1), …, U1(2).The different quantum numbers are ordered by Qnum indices. Each quantum number can have a degeneracy.
In the above output, the number in the square braket [] indicates the Qnum index. In the previous example, bond “f”, which is the outgoing bond of Tsymm, contains three quantum numbers. The element with quantum number U1(2) has the Qnum index [0] on this bond, the U1(0) elements have Qnum index [1], and U1(2) element has Qnum index [2]. The degeneracies are displayed inside the box next to the corresponding bond. For example, the quantum number U1(0) on bond “f” has the degeneracy 2, while all other quantum numbers have degeneracy 1.
7.1.3. print_block()
To print a single block of a UniTensor in block form, one can use UniTensor.print_block(idx) where idx is the block index:
In Python:
1Tsymm.print_block(2)
Output >>
========================
BLOCK [#2]
 |- []   : Qn index
 |- Sym(): Qnum of correspond symmetry
                  -----------
                  |         |
   [1] U1(-1)  -->| 1     2 |-->  [1] U1(0)
                  |         |
   [0] U1(1)   -->| 1       |
                  |         |
                  -----------

Total elem: 2
type  : Double (Float64)
cytnx device: CPU
Shape : (1,1,2)
[[[0.00000e+00 0.00000e+00 ]]]